Benchmarking DirectX11 vs Vulkan in a low-level C++ environment
Written by Manfred Lambrecht


Hi there! My name is Manfred Lambrecht and I worked together with Jorden Laureyssens and Nathan Gijselings to code our own 3D engines in C++. We made a DirectX11 and a Vulkan engine that imports .obj files and texture files. We wrote our own benchmarking tool and our own UI in Python to diagnose the generated data from the benchmarking results.
So if you want to know more about programming your own 3D engines and see how DirectX11 vs Vulkan compare to each other, then you should definitely stick around!
Let's start with a short clip of what this project actually realizes.

What you will see in this blog:
- Graphical pipeline of a 3D engine.
- The differences between DirectX and Vulkan.
- Monitoring and capturing data of the 3D engine.
- Displaying the data in graphs.
- The problems we stumbled upon.
- What we learned in this project.
- How to set up and run the project on your machine.
Graphical pipeline of a 3D engine
 First of all, we will explain the 'boring' stuff before we can proceed with the rest, so you will understand how a 3D engine works. If you already have a basic understanding of how a 3D engine works, you can skip this part.
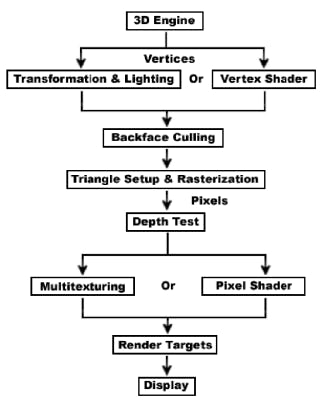 Don't let this complex structure scare you away! We will go over each step and explain to you how a 3D engine goes through the structure every frame. Both our engines go through the same procedure every frame, but each with its own approach.
Initialising the device
First of all, when we start up the engine, it has to determine which device to use. In Vulkan, we went deep and even used our own calculator to determine which device was the best to use.
int DeviceManager::RateDeviceSuitability(VkPhysicalDevice device) {
...
    int score = 0;
    // Discrete GPUs have a significant performance advantage
    if (m_deviceProps.deviceType == VK_PHYSICAL_DEVICE_TYPE_DISCRETE_GPU)
        score += 1000;
    // Maximum possible size of textures affects graphics quality
    score += m_deviceProps.limits.maxImageDimension2D;
    // Application can't function without geometry shaders
    if (!m_deviceFeatures.geometryShader) return 0;
    return score;
}
Vertex shader
Now that we have our device and have imported our object, we can start with the pipeline, starting with the vertex shader. A Vertex shader handles the processing of individual vertices and always has a 1:1 output. We map our position with the coordinates of our texture from input to output.
// DirectX11 example
cbuffer CBuf {
    matrix transform;
};
struct Input {
    float3 position : POSITION;
    float2 texCoord : TEXTCOORD;
};
struct Output {
    float4 position : SV_POSITION;
    float2 texCoord : TEXTCOORD;
};
Output main(Input input){
    Output output;
    output.position = mul(float4(input.position, 1.0f), transform);
    output.texCoord = input.texCoord;
    return output;
}
Backface culling
In this stage, we determine if part of a shape should be visible or not. This will keep the section out of the rest of the process so we gain a much better performance.
In this example, you can see where backface culling has not been set correctly and you actually render shapes that should not be rendered.
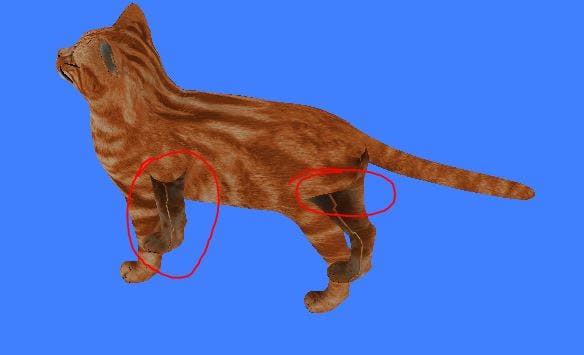 This is a problem in our DirectX project that we couldn't solve yet. Where in Vulkan we could solve and implement correctly.
Rasterization
Here we rasterize the object to pixels by checking per pixel what part of the object we're looking at.
 We are taking in an image and converting it to a raster image.
Depth test
This step is an optional one, as in it's not needed to render an object. It provides depth. When you have two objects placed in a 3D space and depth is not enabled, you'll see that it doesn't matter where your object is placed in the world, the object that is first rendered will always be shown 'before' the other one.
When we enable depth, you'll see that this problem gets solved and you actually get the desired result.
Here depth is disabled.
 Here you can see the object is now rendered correctly when we have enabled our depth buffer.
Pixel shader
A pixel shader, sometimes called a fragment shader, is responsible for determining the brightness, contrast, and other characteristics of a single pixel.
We did not implement lighting so our pixel shader is still 'simple'. Our pixel shader is just mapping the color to the correct pixel.
// Vulkan pixel shader
#version 450
#extension GL_ARB_separate_shader_objects : enable
layout(binding = 1) uniform sampler2D texSampler;
layout(location = 0) in vec3 fragColor;
layout(location = 1) in vec2 fragTexCoord;
layout(location = 0) out vec4 outColor;

void main() {
    outColor = vec4(fragColor * texture(texSampler, fragTexCoord).rgb, 1.0);
}
// DirectX pixel shader
Texture2D shaderTexture;
SamplerState SampleType;

struct PixelInputType {
    float4 position : SV_POSITION;
    float2 tex : TEXTCOORD;
};

float4 main(PixelInputType input) : SV_TARGET {
    float4 textureColor;
    // Sample the pixel color from the texture using the sampler at this texture coordinate location.
    textureColor = shaderTexture.Sample(SampleType, input.tex);
    return textureColor;
}
Render targets
Last but not least, a render target is also known as an RTT (Render target texture). You can see this as a buffer, where you save what you rendered. You'll mostly save to multiple buffers, like a pixel buffer and a texture buffer, so when you want to draw the frame, the program asks for the data from the buffer.
Now that we quickly went over the principles of a typical render pipeline, we can start explaining the actual project.
The differences between DirectX and Vulkan.
No point beating around the bush here. Vulkan is way more complex than DirectX11. Most of the code in DirectX11 is done for you, whereas in Vulkan, you have to initialize way more. But don't let that scare you! Vulkan is a powerful API with a clear and educative tutorial, found here that we used to get started with Vulkan.
DirectX11 is the previous iteration of the DirectX lineage. The most up-to-date version is DirectX12 with DirectX13 on the way. Vulkan, however, is based upon OpenGL but is being developed independently from it.
When I was working on the projects, I was more into Vulkan because it was so easy to understand what happened where, so I could make changes where I want without having to look up everything. I feel like for DirectX, I could not live without the documentation.
So DirectX11 was released in 2008, whereas Vulkan was released in 2016 which makes it a newer platform with less qualitative documentation. Vulkan is designed to work cross-platform, while DirectX11 only works on Microsoft and Xbox.
When it comes to multithreading. Vulkan is the clear winner, because of its low overhead and the wide support of multithreading. Because DirectX11 can only send synchronous commands to the GPU. But Vulkan (and the new DirectX12) support multiple threads, to send commands to the GPU simultaneously.
Monitoring and capturing data of the 3D engine.
In a 3D engine, you always have some sort of loop, where you would draw a new frame for every iteration. Which we can use for our benchmarking.
The benchmark library will be initialized with a runtime, through a param. So when this runtime expires, benchmark.run() will return false and the application will exit gracefully.
while (benchmark.run()) {
        renderer.BeginFrame();
        graphics.Draw();
        benchmark.UpdateBenchmark();
        renderer.EndFrame();
    }
So for every frame, we will update the benchmark. Let's take a look at what happens.
void Benchmark::UpdateBenchmark() {
    CalculateFPS();
    if (timeGetTime()>= (m_UpdateLastTime + 33)) //33 millisecond delay between text updates {
        UpdateTimer();
        CalculateCPU();
        UpdateBenchmarkWindow();
        m_UpdateLastTime = timeGetTime();
    }
    if (time >= (m_lastLogTime + 1000)) {
        Log log = Log(time, m_pc_id, m_render_engine, m_object_name, m_currentFPS, m_cpuUsage);
        m_logger->AddLog(log);
        m_lastLogTime = time;
    }
void Benchmark::CalculateFPS() {
    m_FPSCount++;
    if (timeGetTime() >= (m_FPSLastTime + 1000)) //1000 reffers to frames per 'second', we count how many frames are counted in 1 seconds and diplay them every second {
        m_currentFPS = m_FPSCount;
        m_FPSCount = 0;
        m_FPSLastTime = timeGetTime();
        CalculateMeanFPS();
    }
    return;
}
So for every frame, we call updateBenchmark() where we simply count how many times the function is called per second, which is the Frames per second. When we have the current FPS, we update the mean FPS.
We update our timer, CPU usage, and the window where we display all the statistics every 33 milliseconds.
Now that we have our data from the render we can process the data and save it to a file. We do this when we destroy the benchmark class. The benchmark will run as long as benchmark.run() is true, so when the timer does not exceed the given timeframe, the application will keep on running.
Benchmark::~Benchmark() {
    m_logger->ExportLogFile();
    delete m_logger;
}
When you take a look at UpdateBenchmark() again, you'll see that we also took a 'snapshot' every second to export to a log file afterward.
void Benchmark::UpdateBenchmark() {
    CalculateFPS();
    if (timeGetTime()>= (m_UpdateLastTime + 33)) //33 millisecond delay between text updates {
        UpdateTimer();
        CalculateCPU();
        UpdateBenchmarkWindow();
        m_UpdateLastTime = timeGetTime();
    }
    if (time >= (m_lastLogTime + 1000)) {
        Log log = Log(time, m_pc_id, m_render_engine, m_object_name, m_currentFPS, m_cpuUsage);
        m_logger->AddLog(log);
        m_lastLogTime = time;
   }
}
When you take a look at the ExportLogFile() function of the Logger class, you'll see that we wrote every log we captured to a corresponding file.
 void Logger::ExportLogFile() {
    ofstream file;
    file.open(getTimeTypeName(m_timeType) + "-data-" + m_engine + "-" + m_objectName + ".csv");
    file << "timestamp" << m_separator << "pc-id" << m_separator << "engine" << m_separator << "object" << m_separator;
    switch (m_timeType) {
        case TimeType::rt:
            file << "fps"; break;
        case TimeType::nrt:
            file << "spf"; break;
        default:
            throw runtime_error("unhandled time type"); break;
    }
    file << m_separator << "cpu\n";

    //skip first 2 logs as it's always inaccurate as the program will be in the process of booting up.
    for (size_t i = 2; i < m_logs.size(); i++) {
        file << m_logs[i].m_timestamp << m_separator << m_logs[i].m_pcId << m_separator << m_logs[i].m_engine << m_separator << m_logs[i].m_objectName << m_separator << m_logs[i].m_frames << m_separator << m_logs[i].m_cpuUsage;
        if (i < m_logs.size() - 1) //if not the last log, start a new line for the next log
            file << '\n';
    }
    file.close();
}
If you want to know more about capturing data from a 3D engine in C++, look here. DirectX and Vulkan are similar in this regard.
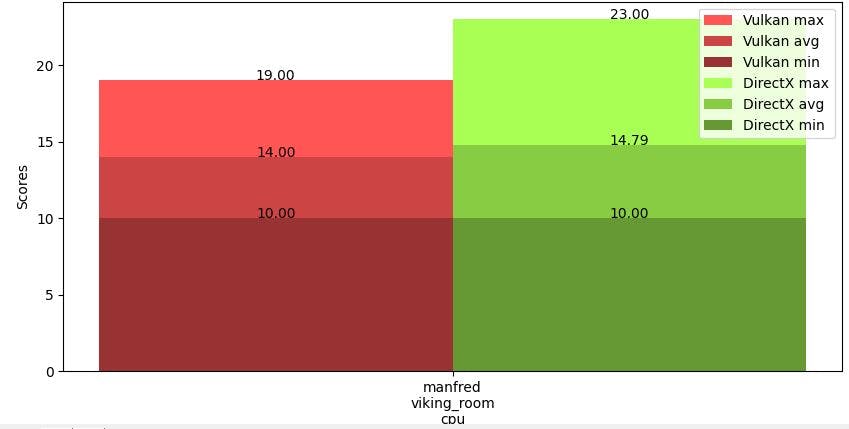
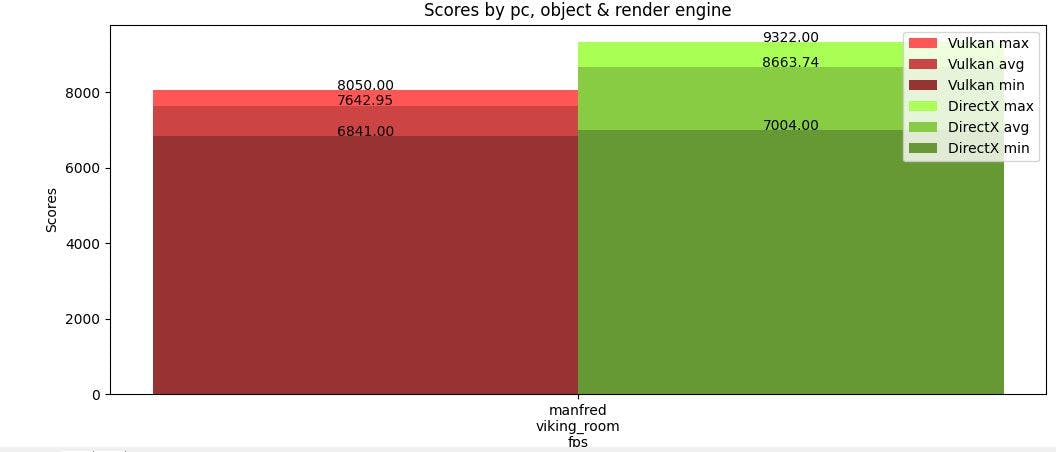
Displaying the data in graphs
To display our data we used Python so we could use matplotlib. We hadn't worked with Python yet, so we saw this as an opportunity.
First of all, let's take a look at the data we generate when we run the benchmark. We have our timestamp, our PC-ID that we specified when we ran the benchmark, the 3D engine, the object we used during the benchmark, the current FPS at that moment, and lastly, the CPU percentage we were using at that moment.
timestamp;pc-id;engine;object;fps;cpu
18190194;manfred;directx11;cat;6898;0
18191194;manfred;directx11;cat;7261;15
18192194;manfred;directx11;cat;7197;11
18193194;manfred;directx11;cat;7231;13
For every benchmark run with a unique combination, we'll get a new file with all the data and use it to compare the two engines.
If you want to know more about the Python application, you can find the code back here.
The problems we stumbled upon
Different object sizes
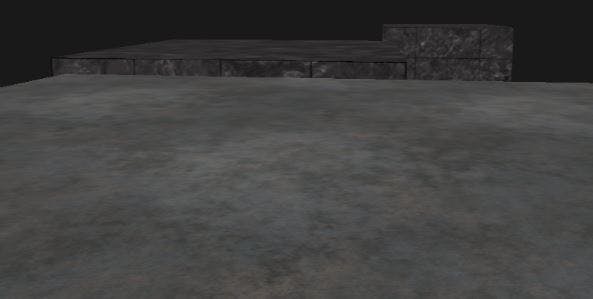
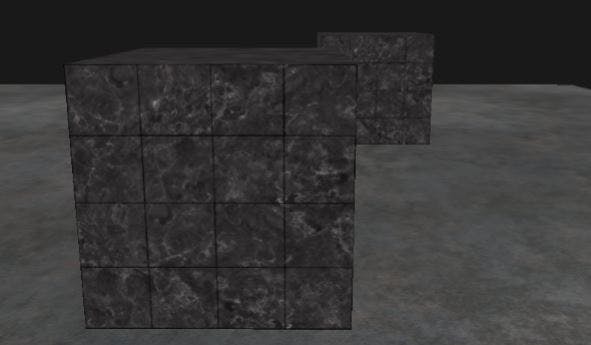
3D objects are made out of vertices and indices. The object is created and exported (e.g. from Blender) to an OBJ file. When we want to draw an object larger than the viewport, it would not fit. So we needed to find a solution for this. The OBJ file contains vertices with their representative x, y and z coordinates.
mtllib viking_room.mtl
o mesh_all1_Texture1_0
v -0.573651 0.001530 0.713748
v -0.573651 0.151382 -0.000154
v -0.573651 0.164474 0.619081
v -0.573651 -0.172251 0.629386
v -0.573651 -0.158077 -0.000154
...
Let's use the coordinates to calculate"what the farthest point is of the object and use that to change the view accordingly.
void Graphics::loadModel(Renderer& renderer, string model_path) {
...
   //for each vertex point
   updateFarestPoint(vertex.pos.x, vertex.pos.y, vertex.pos.z);
...
}
void Graphics::updateFarestPoint(int x, int y, int z) {
    if (x < 0) negativeToPositive(&x);
    if (y < 0) negativeToPositive(&y);
    if (z < 0) negativeToPositive(&z);

    if (m_farestPoint < x) m_farestPoint = x;
    if (m_farestPoint < y) m_farestPoint = y;
    if (m_farestPoint < z) m_farestPoint = z;
}

void Graphics::negativeToPositive(int* a) {
    int b = *a * 2;
    *a -= b;
}
For each vertex point we determine whether the point is negative or not. If so, we convert it to a positive point.
In DirectX we scale the object to its correct size so it will fit into the window.
float scalemultiplier = 1 / (float)m_farestPoint;
XMVECTORF32 const vScale = { .4f * scalemultiplier, 0.48f * scalemultiplier, .4f * scalemultiplier};
In Vulkan, we move the camera backwards.
int farestPoint = m_modelImport.GetFarestpoint();
ubo.view = glm::lookAt(glm::vec3(2.0f + farestPoint * 1.1, 2.0f + farestPoint * 1.1, 2.0f + farestPoint * 1.1), glm::vec3(0.0f, 0.0f, 0.0f), glm::vec3(0.0f, 0.0f, 1.0f));
This solution fixed our problem where an object would be rendered too big and would not be visible on-screen because of its size.
Memory leaks
Another problem we stumbled upon was memory leaks. This has nothing to do with the DirectX or Vulkan API but is important to mention.
In C++ you don't have an automatic garbage collector like in Java or C#. So Memory management is completely up to you.
When you declare, for example: Window* window = new Window(); You need to destroy that object after you are done with it, like so destroy window; Otherwise you would create a memory leak.
C++ has a handy functionality where a destructor is called when the application stops, or when you destroy an object.
In DirectX, we used the Release functions of their API
Graphics::~Graphics() {
    m_vertexBuffer->Release();
    m_indexBuffer->Release();
    m_constantBuffer->Release();
    m_vertexShader->Release();
    m_pixelShader->Release();
    m_inputLayout->Release();
    m_rasterizerState->Release();
    m_depthState->Release();
    m_blendState->Release();
}
Whereas in Vulkan we used the specific function of the API to destroy our object
Graphics::~Graphics() {
...
    vkDestroySampler(m_device, m_textureSampler, nullptr);
    vkDestroyImageView(m_device, m_textureImageView, nullptr);
    vkDestroyImage(m_device, m_textureImage, nullptr);
    vkFreeMemory(m_device, m_textureImageMemory, nullptr);
    vkDestroyDescriptorSetLayout(m_device, m_descriptorSetLayout, nullptr);
...
}
The point is, whatever you create, you have to destroy. Maybe think ahead and look into how you can manage your memory. For example, do not create a new object every loop, but reuse the previous object with a pointer and overwrite the old one instead.
What we learned in this project
Graphical pipeline
We're not getting deeper into this subject as mentioned and described at the beginning of this blog. The graphical pipeline of a 3D engine is one of the most important parts of the loop. It defines how pixels are drawn onto your screen.
Error handling
DirectX and Vulkan have a distinct lack of error handling, so we had to implement it ourselves.
In DirectX, most methods will return HRESULT. So we implemented a simple method GFX_THROW_INFO that captures the result, gives us information on what went wrong, and handles the exception.
GFX_THROW_INFO(DirectX::CreateWICTextureFromFile(m_rendererPtr->getDevice(), file, &m_texture, &m_textureView));
In Vulkan, we had to take another approach because Vulkan does not throw internal errors, but logs them instead. We went and used VK_EXT_debug_utils from the API
to read these error logs.
VKAPI_ATTR VkBool32 VKAPI_CALL Debug::DebugCallback(VkDebugUtilsMessageSeverityFlagBitsEXT messageSeverity, VkDebugUtilsMessageTypeFlagsEXT messageType, const VkDebugUtilsMessengerCallbackDataEXT* pCallbackData, void* pUserData) {
    printError << "validation layer: " << pCallbackData->pMessage << newLine;

    return VK_FALSE;
}
Now we will get feedback in a terminal about what happened.

Main differences between Vulkan and DirectX11
Nvidia GPUs have better support for DirectX and AMD GPUs generally work easier with Vulkan. We note that if we look at game development we see that developers almost always go with DirectX for a windows based application, but when they want to make a cross-platform game, they will likely look into Vulkan for MacOs and Linux and still go with DirectX for Windows. There are not many games that support both 3D APIs on Windows, but there are a few, like Red Dead Redemption 2.
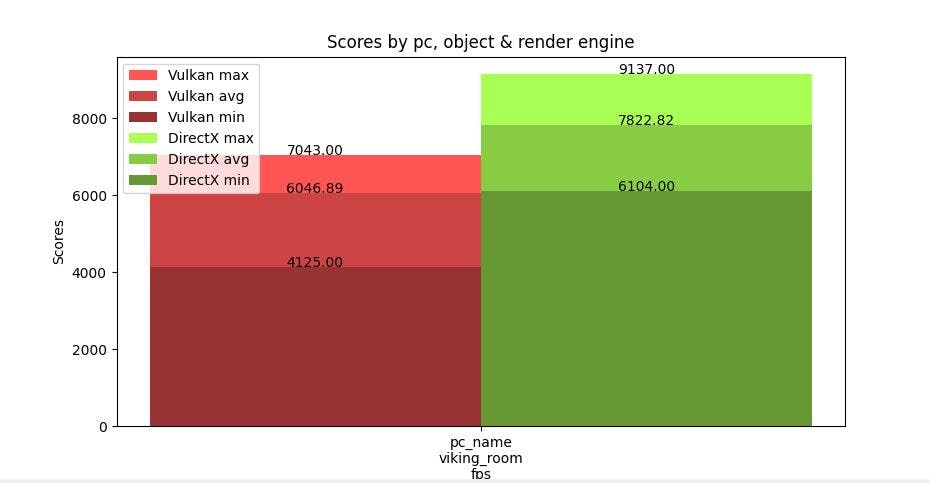
Which one has a higher framerate?
This is what we are all here for. Which one is the most efficient and has a higher frame rate with the lowest CPU usage? Well... it depends. It depends on which hardware you have. That's why we have a benchmark for you! You can simply run the tool and see how your computer performs.
In our test, we saw that DirectX will have more CPU spikes but will have around the same mean CPU usage over time. DirectX also has a higher frame rate than Vulkan. What we can make out from the numbers is that Vulkan is a little more stable and reliable than DirectX, where DirectX has more fluctuations.
Creating an abstract benchmark library that works the same on both API's
As mentioned above, we created an abstract library that benchmarks both of our projects. The main intention was to make it as abstract as possible with a low coupling to DirectX and Vulkan.
So we started with a simple screen that will pop up when you initialize a Benchmark.
Benchmark benchmark(runTime, name, engine, MODEL_PATH);
It takes a few arguments such as, how long it needs to run. So we can wile loop over benchmark.run(); and the application will stop when the time has run out.
It also expects the reference name and the engine, so the logger knows what engine we are working in. The model path is also needed so we can gather the name of the object and place it in our log export.
If we look into the constructor of our Benchmark class we see that it simply initiates every part (Window, Timer, FPS, CPU usage, and the logger).
Benchmark::Benchmark(int run_time, string pc_id, string render_engine, string object_path) {
    m_runTime = run_time;
    m_render_engine = render_engine;
    InitialiseWindow();
    InitialiseFPS();
    InitialiseCPU();
    InitialiseTimer();
    InitialiseLogger(pc_id, GetModelName(object_path), render_engine);
}
It is as simple as that. If you want to know more about the code, you definitely should take a look here (todo).
Better understanding of the C++ language (memory management, pointers)
We came across an intensive amount of memory management and usage of pointers. When you work with C++ you need to keep memory management into account.
We used many call-by-references so we don't need to create an object twice when it's not needed.
Let's take a look at this simple example in this piece of code again. It has its own ingenuity where it takes a pointer of an int int* a, so we can access the data that is stored at the pointer and change it to, in this case, a positive number.
void Graphics::updateFarestPoint(int x, int y, int z) {
    if (x < 0) negativeToPositive(&x);
...
}
void Graphics::negativeToPositive(int* a) {
    int b = *a * 2;
    *a -= b;
}
This is just a simple example in c++ and it can get much more complicated. You can always find more info about pointers here.
How to set up and run the project on your machine.
As you may know, Vulkan is an API that works cross-platform, whereas DirectX is a Windows-only 3D API. Because of this, we opted for a Windows-only application.
If you are here just to run the project, you can easily do that by pulling this repo and following the README. You should be ready to go in under 2 minutes!
We divided all the work into 4 projects. Wich is:
- All the projects
- DirectX (C++ 3D engine with benchmark library)
- Vulkan (C++ 3D engine with benchmark library)
- Ui-diagnostics (Python project for displaying data)
- Run-it-all-together (The above 3 projects compiled with example objects)
GitLab Repository
You can find all the code in this repository and use it accordingly with the standard MIT-license. You can find specific project information in the README in each project.
Developed and hosted with ❤️ on Github